

Summer cardigan - Part 4
We are now coming to the grand finale of the Summer Cardigan knit-along! This week, we’ll knit the front button/buttonhole bands and the pockets! You’ll also have a chance to add that little something extra in the form of charming buttons and ribbon. It will be exciting to see what you choose!
Knitting the front button and buttonhole bands
It is practical to knit the front bands before cutting the steek open because the bands offer additional stabilization before the cutting. It is also easier to work with the whole garment when the cardigan front pieces are still connected.
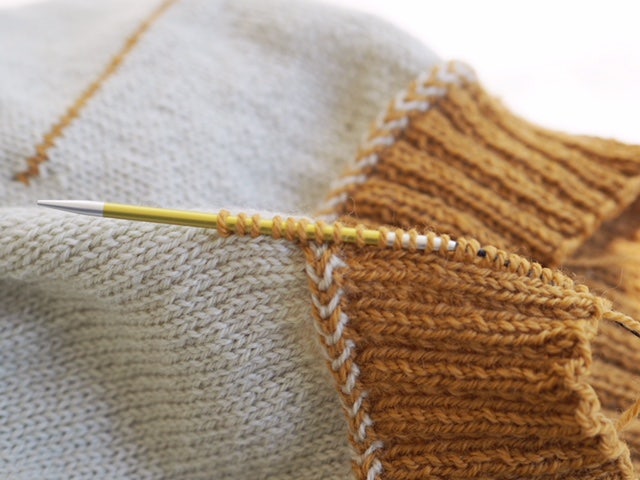
Pick up and knit the recommended number of stitches along each front following the information in the pattern. So that the front bands won’t be either too tight or too loose, pick up and knit 3 stitches for every 4 rows. In other words, skip about every 4th row when picking up stitches. At the beginning and end of the row (when picking up and knitting stitches into the ribbing), I recommend that you pick up and knit 1 stitch in every row so that the top and bottom edges won’t be too tight.
Spacing the stitches evenly
The pattern recommends the number of stitches to pick up and knit and these must be spaced evenly along the front bands. If you follow my recommendation above (picking up and knitting 3 stitches for every 4 rows), the stitches should be spaced evenly. However, it is a good idea to double check to ensure that the stitches are the same in each quarter of the band. You can do this by placing markers: First in the center and then in the center of each half. This way, you will be certain you have picked up a quarter of the total stitches as you get to each respective marker.
Now work the front bands following the instructions in the pattern. Don’t forget the buttonhole row on the right front band!
Sewing a reinforced seam
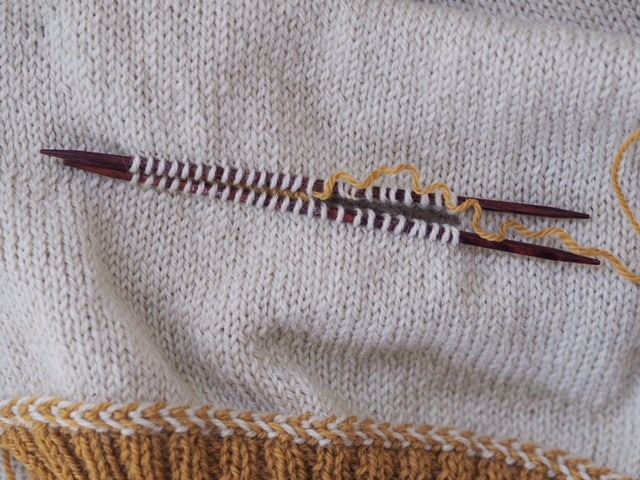
I always sew my reinforcing seams by hand using regular sewing thread and a sewing needle. That way, I have control over the knitted fabric and can avoid seaming that might cause the fabric to draw in or ruffle in some way. By hand-sewing, I get a flexible and correctly-aligned seam, easily and neatly. I also think that hand sewing seams is a very pleasant activity!
Sew a BACK STITCH reinforcement seam on EACH SIDE of THE CENTER STEEK STITCH (= 2 seams total).
Cutting the steek open
Once you’ve sewn the reinforcement seams, you are ready to cut the cardigan open down the steek.
Work as follows:
- Place the sweater on a flat surface with a lot of room for moving it around.
- Cut with small, sharp sewing scissors.
- Work slowly and methodically when you are cutting so you have control of what you are doing.
- Let your left hand (or right hand if you are left-handed) follow and support the work the whole time as you cut, so you can be sure the front of the cardigan is separate from the back. You don’t want to risk cutting into the back of the sweater.
- Cut the sweater following the line of the center steek stitch!
Tips: If you want to separate the front and back from each other completely before you cut the steek, you can place the cardigan on an ironing board. Pull on the bottom first so that the lower edge of ribbing lands about in the middle of the ironing board and the neckband lies on the narrow front end of the ironing board. The board, of course, offers a good flat surface.
When you’ve cut the steek open, the edges will roll in towards the wrong side of the sweater. Read below about covering the cut edges with ribbon or sewing them down with yarn.
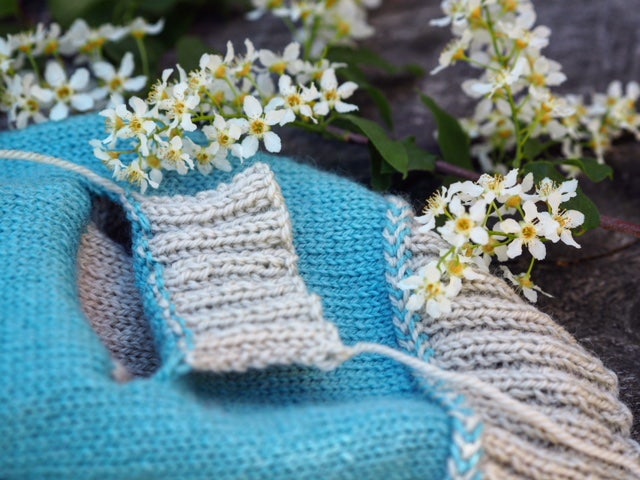
Knitting the pockets
Knit the pocket linings and ribbing following the pattern instructions. The stitches above the pocket waste yarn will begin the pocket lining which is worked in stockinette with the contrast color. The stitches below the waste yarn will be worked upwards for the ribbing edging the pocket, also worked in the contrast color.
NOTE: Before you remove the waste yarn at each pocket, insert one double-pointed needle into the row of stitches above the waste yarn and another needle into the row of stitches below the waste yarn. That way you won’t lose any stitches unnecessarily! Make sure to sew the two different pocket parts with the yarn color stated in the pattern so that the finishing will be neat! When you are sewing down the pocket linings as well as the edges of the ribbing, follow the same stitch lines in the body so the pieces will be straight.
Ribbon
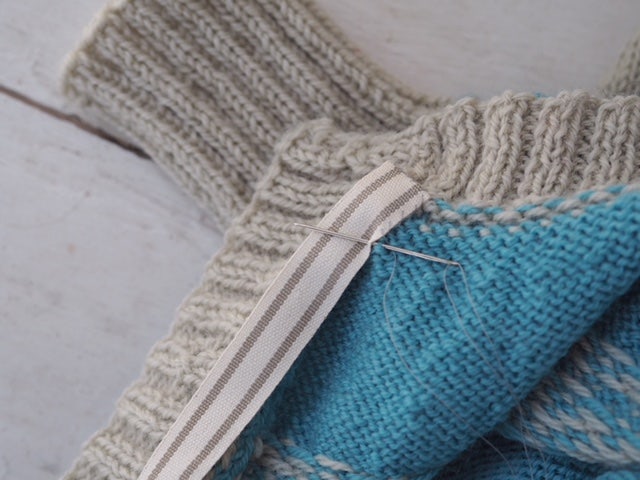
A ribbon sewn on the inside of each front band will look nice and make the bands extra stable.
If you want to cover the cut edges with pretty ribbon, I recommend that you choose a ribbon at least 5/8 inches / 1.5 cm wide. I love working with ribbons in fibers such as cotton, wool, or linen. It is, of course, also fine to use ribbons of synthetic material but choose one that isn’t too smooth or slick on the surface. I think slippery ribbon is more difficult to work with because it slides around too easily while you are sewing. Ribbon with a more matt or rough surface will lie flat and aligned and bond with the knitted structure beneath the sewing!
An interwoven ribbon (that is, ribbon with a woven-in rather than printed pattern) would be especially nice. Woven ribbons will retain the pattern over time even with repeated washings. However, you’ll find an abundance of printed ribbons with both pretty and fun motifs or texts. They also work well, but, please, buy good quality ribbon so the pattern won’t disappear in the wash!
When you edge your cardigan with ribbon it is important that both edges are the same length, so neither edge sticks out more than the other when the ribbon is sewn on. Begin by cutting two equal-size lengths of ribbon. Measure the length of one of the sweater front edges (stretched to its recommended length). Then add ¾ inch / 2 cm seam allowance at each end (= a total of 1½ inches / 4 cm). (Note that the ribbon should not cover the sweater ribbing at the bottom and top of the band. The ribbon just covers the cut edges.)
Pin the ribbons on the inside of the cardigan so they cover the cut edges and then fold double at each end. Sew down the ribbons with needle and thread, using small, almost invisible stitches down each band.
If you don’t want ribbon edging the cardigan, you can, instead, fold the cut edges so that the raw edges face inward. Then sew down the edges with small almost invisible stitches using a tapestry needle and leftover yarn.
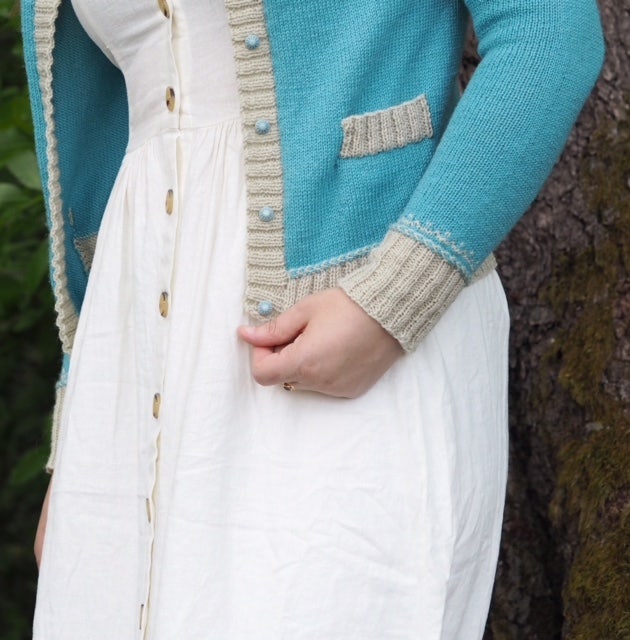
Buttons
Buttons are some of the most charming things, aren’t they?
You’ll need 8 buttons about 3/8-5/8 inch / 1-1.5 cm in diameter. Place them to match the spacing of the buttonholes and then sew them on securely with needle and thread.
Blocking
I will provide a separate entry on blocking the cardigan next week! Good luck with everything!
If you have any questions, feel free to ask them below or in our collective Facebook group “Summer Cardigan/Sommarkoftan.”
PS: Check out our Facebook group, Summer Cardigan/Sommarkoftan – you’ll find pictures, tips, and inspiration. Also, please share your work on Facebook and Instagram (@jarbogarn). Don’t forget to include the hashtag #summercardigan / #sommarkoftan.